Quickstart
What is laser engraving ?
Laser engraving is a process that uses a laser to cut or engrave materials such as metal, glass, plastic or wood. The laser beam vaporizes or melts the material to create a permanent, precise and high quality engraving or cutting pattern. Unlike a laser printer that transfers ink (toner) to a piece of paper, laser engraving thermally alters material to create a color change.
About us and our service
In our workshop, we use modern CO2 engraving lasers with a power of 60 watts and a maximum working area of about 750 x 450 mm for the production of customized front panels, logos and similar inscriptions. This allows for efficient order processing while maintaining high quality inscriptions.
We mainly use plastic and acrylic sheets consisting of two different colored layers for the faceplate production. These materials are available in many different color combinations and material thicknesses, with black and white being the classic choice.
Intro
In order for the laser to know where to engrave and where not to engrave, as well as what shapes to cut and where, data is required in the form of vector graphics at a scale of 1:1. These must be prepared by the customer according to a few simple rules and supplied with the order.
A vector drawing program such as Corel Draw (commercial), Inkscape (open source, free), or Adobe Illustrator (commercial) should be used to create the data.
Laser engraving is generally divided into two modes:
Engraving:
The laser beam vaporizes the surface of the material, revealing structures such as words or graphics.
Cutting:
The material is cut along a line defined in the data with the laser, so that in addition to the corresponding inscription, the corresponding recesses are present on the front panel.
The thickness of the line determines whether it is an engraving or a cut. All lines thinner than 0.15 mm are interpreted as cutting lines. They tell the laser "cut here!"
Line thicknesses greater than 0.2 mm, areas or fonts, on the other hand, tell the laser "engrave here!"
Let’s go into the details
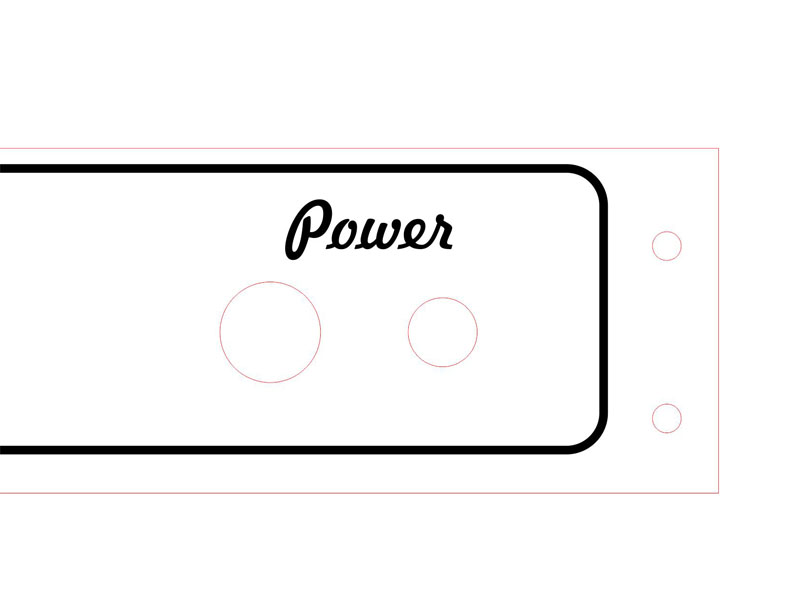
The first image is an excerpt from a front panel showing a small example. The word "Power" is contained in the data as text and is therefore engraved exactly where the letters are. In this process, the top layer of the material is burned away, exposing the bottom layer and making the text "visible".
At this point, many beginners may have a little problem understanding, because if the front panel is supposed to be black and the text is supposed to be white, why is the text in the data black? Quite simply, the color in the data has nothing to do with the actual colors, it simply tells the laser where to engrave (black) and where not to (white). The colors themselves are determined by the material used.
The thick black line with rounded corners has a line width of 2mm and will therefore be engraved. If the line thickness were less than 0.15 mm, there would be a problem because the laser would cut the line instead of engraving it, which is not what is desired in this case.
On the other hand, cutting is desired in other areas: first the two holes below the word "Power", then the two holes to the right, and finally the front panel itself. This is done with the red rectangular shape. These cutting lines are shown in red in the example and have a line thickness of 0.15 mm (in CorelDraw it is recommended to use "hairline" as line thickness) and signal "Cut line. Cut here!" The cut line can be any color, since it is defined by the line thickness alone, but we recommend using RGB red because it quickly indicates what is actually being cut.
And that's the whole secret.
Pitfalls?
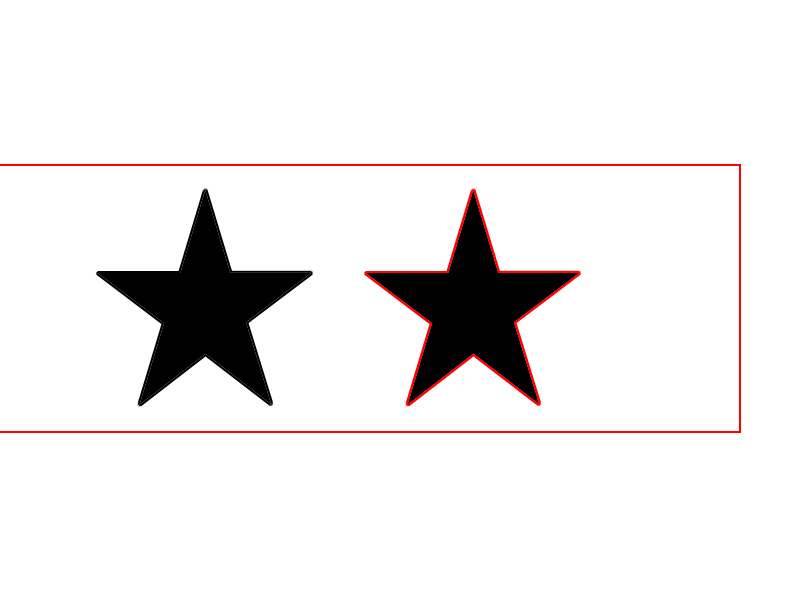
Naturally, there are also some pitfalls, otherwise things would be too easy. An example is shown in the second figure with the two stars:
At first glance, one might think that both stars will be engraved and then the panel will be cut along the red line. This is essentially correct, but the right star will also be cut out.
Why? If you look closely, you can see a thin red line that runs around the star and has a thickness of less than 0.15 mm, which is interpreted and cut by the laser as a cutting line.
The line could also be black, like the star, but the laser would still cut it because the line has a thickness of less than 0.15 mm.
Therefore, it is important to check very carefully with all objects whether there is an outer line present next to the filled area that is thinner than 0.15 mm, otherwise the engraved object will become a cut-out object. Change the line thickness to at least 0.2 mm, then everything will fit.